How to Condukt
Condukt is a performance-focused MIDI controller that turns your iOS device into a hands-on interface for your hardware synthesizers. It adds more knobs and faders to your synth, ways to modulate them and several very different kinds of sequencers to trigger notes.

The Problem
Hardware synths are amazing, but parameters are often buried in menus. Want to tweak the filter cutoff, resonance, and envelope depth together? Often it’s impossible without external control.
Even worse, if you want to save different parameter combinations for a live set, you're stuck with the synth's own preset system—which might not be flexible enough for performance.
The Solution
There are a lot of great hardware MIDI controllers that do this very well (shoutout to Neuzeit's Drop, FaderFox and Oxi, I use and love all of them), but we wanted to create something that would work great on a touchscreen, so here we are.
Condukt gives you four types of controls that work together to create a powerful, expressive performance system:
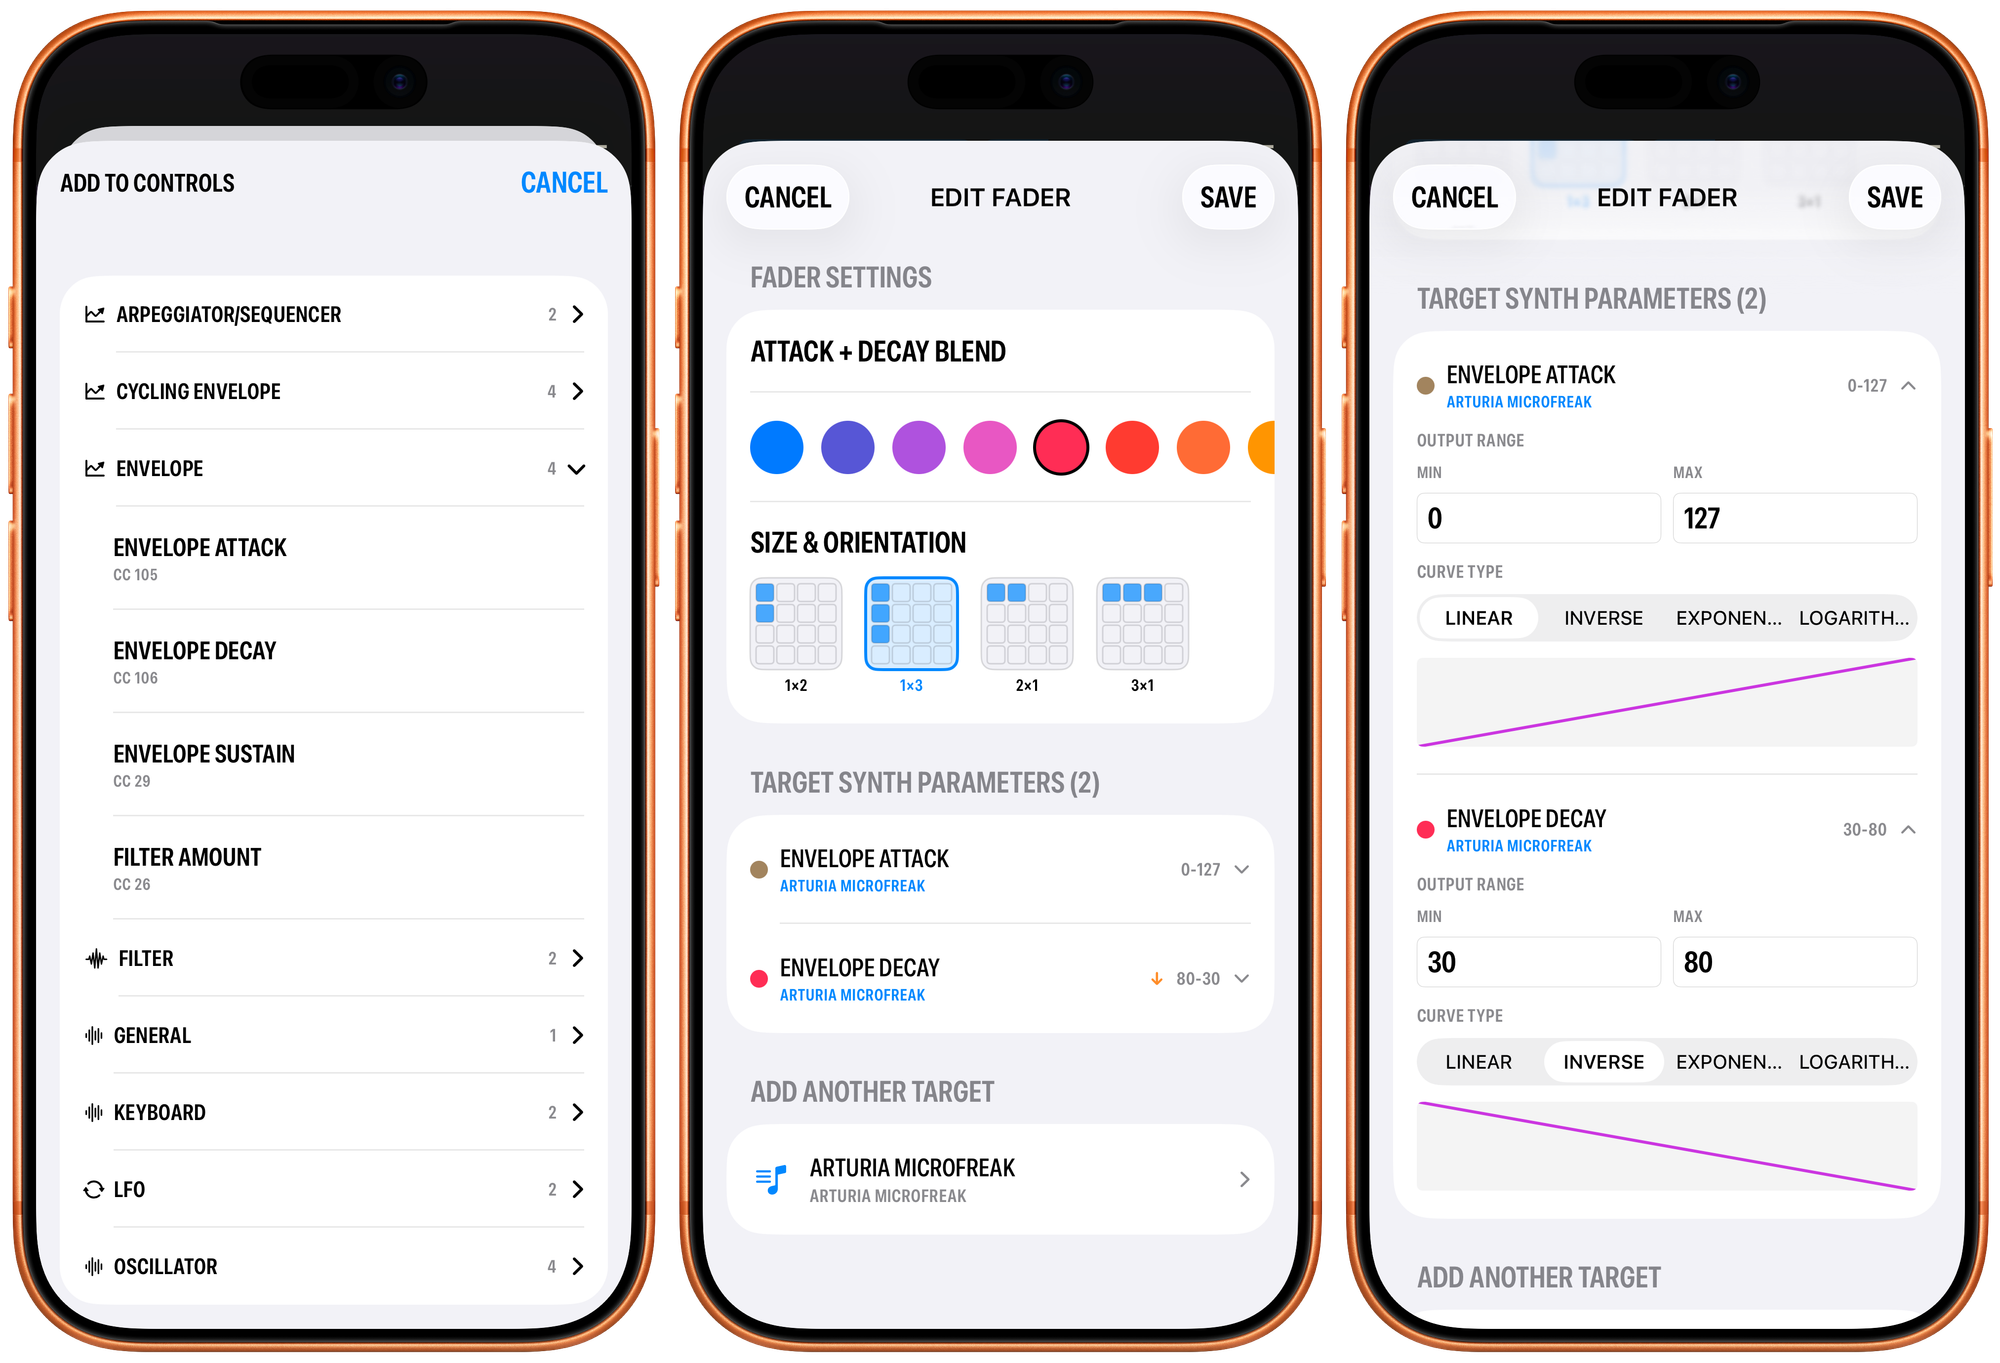
1. Faders
These are your direct connections to synth parameters. Drop a fader on your board and map it to a control on your synth: filter cutoff, oscillator pitch, envelope decay, whatever you need.
A single fader can control the same parameter across multiple tracks. Got a Digitakt with 8 tracks? Map one fader to filter cutoff on tracks 1-4, and now you can sweep all four filters together with a single gesture (the original problem I was trying to solve).
Use faders for:
- Parameters you want immediate, hands-on control over
- Controlling the same parameter across multiple tracks simultaneously (e.g., filter cutoff on 4 tracks, or just 4 different controls across 4 different synths)
- Creating a personalized interface for any synth
Hands-free: Condukt controlling Microfreak, with EP-133 on drums and delay
I also use faders to create a fun control surface for Microfreak: even though Microfreak exposes almost all of its parameters as knobs or encoders, I created a control surface that I can do scene morphs (a la Octatrack), for some very cool transitions and build-ups. That's what you see in the video above.
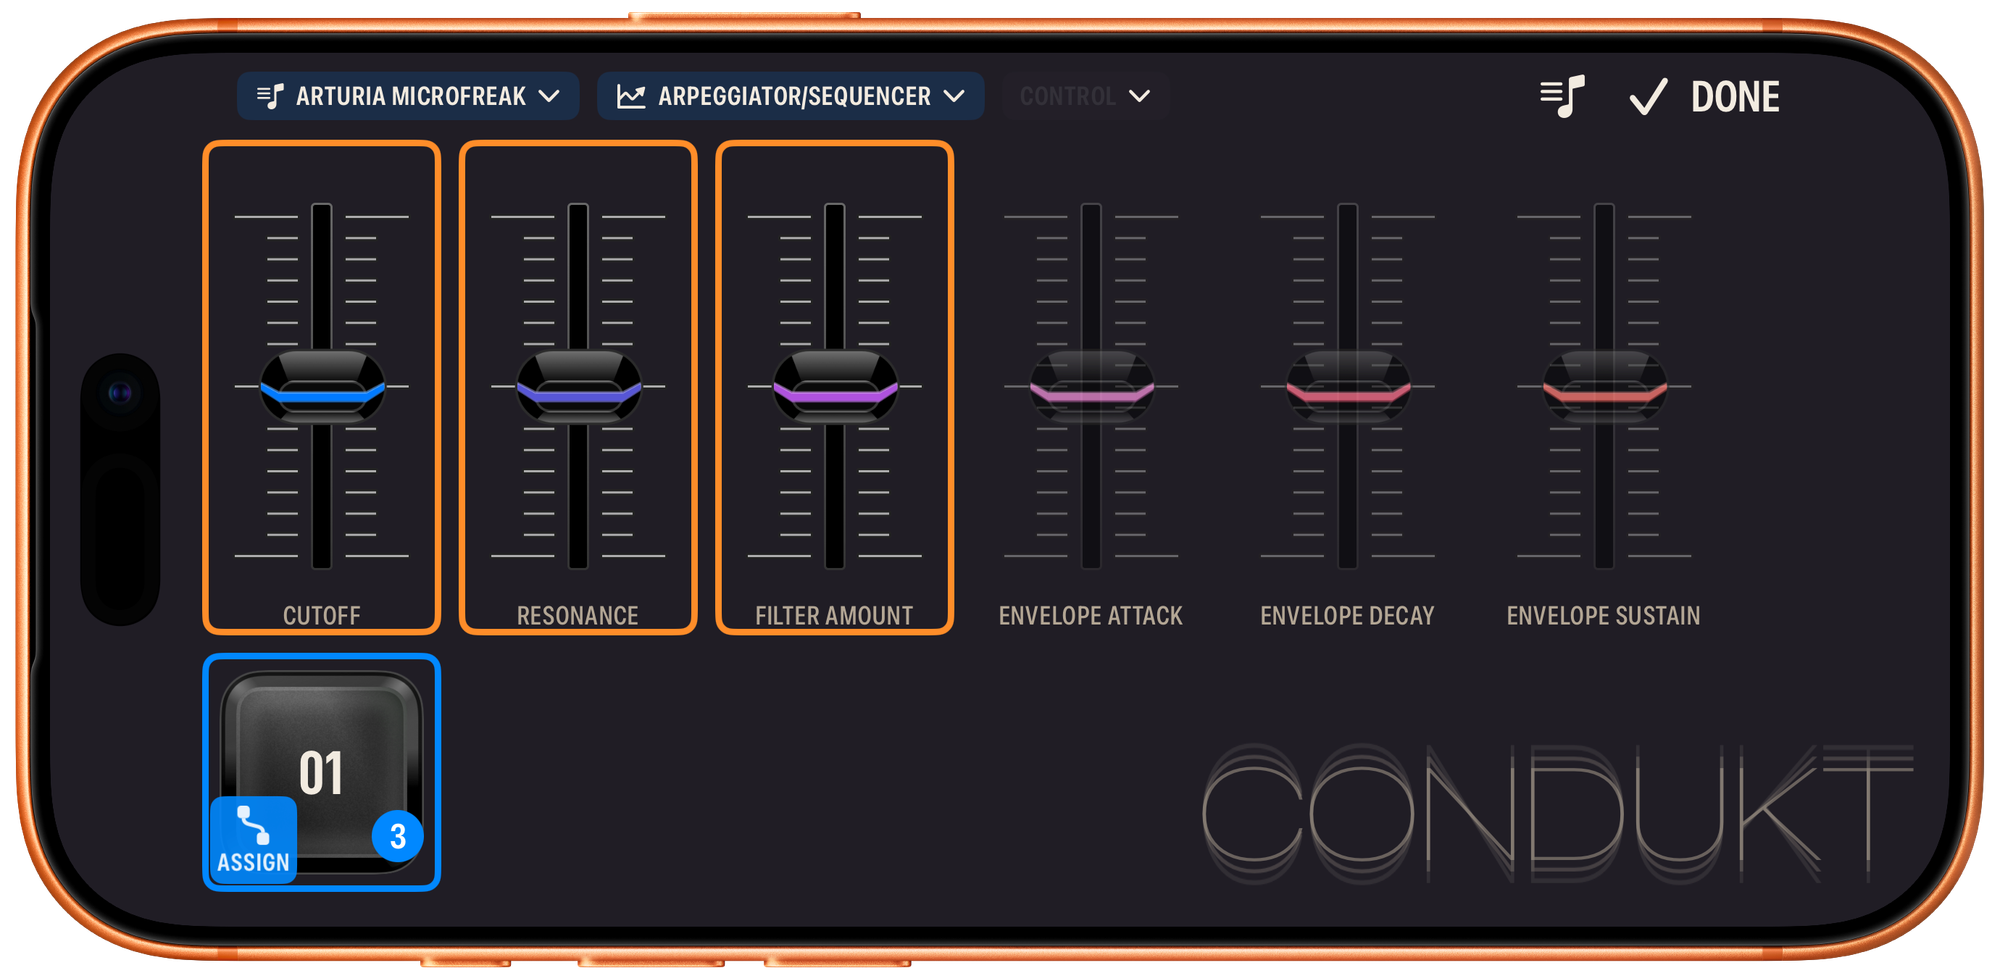
2. Recalls (Scene Memory)
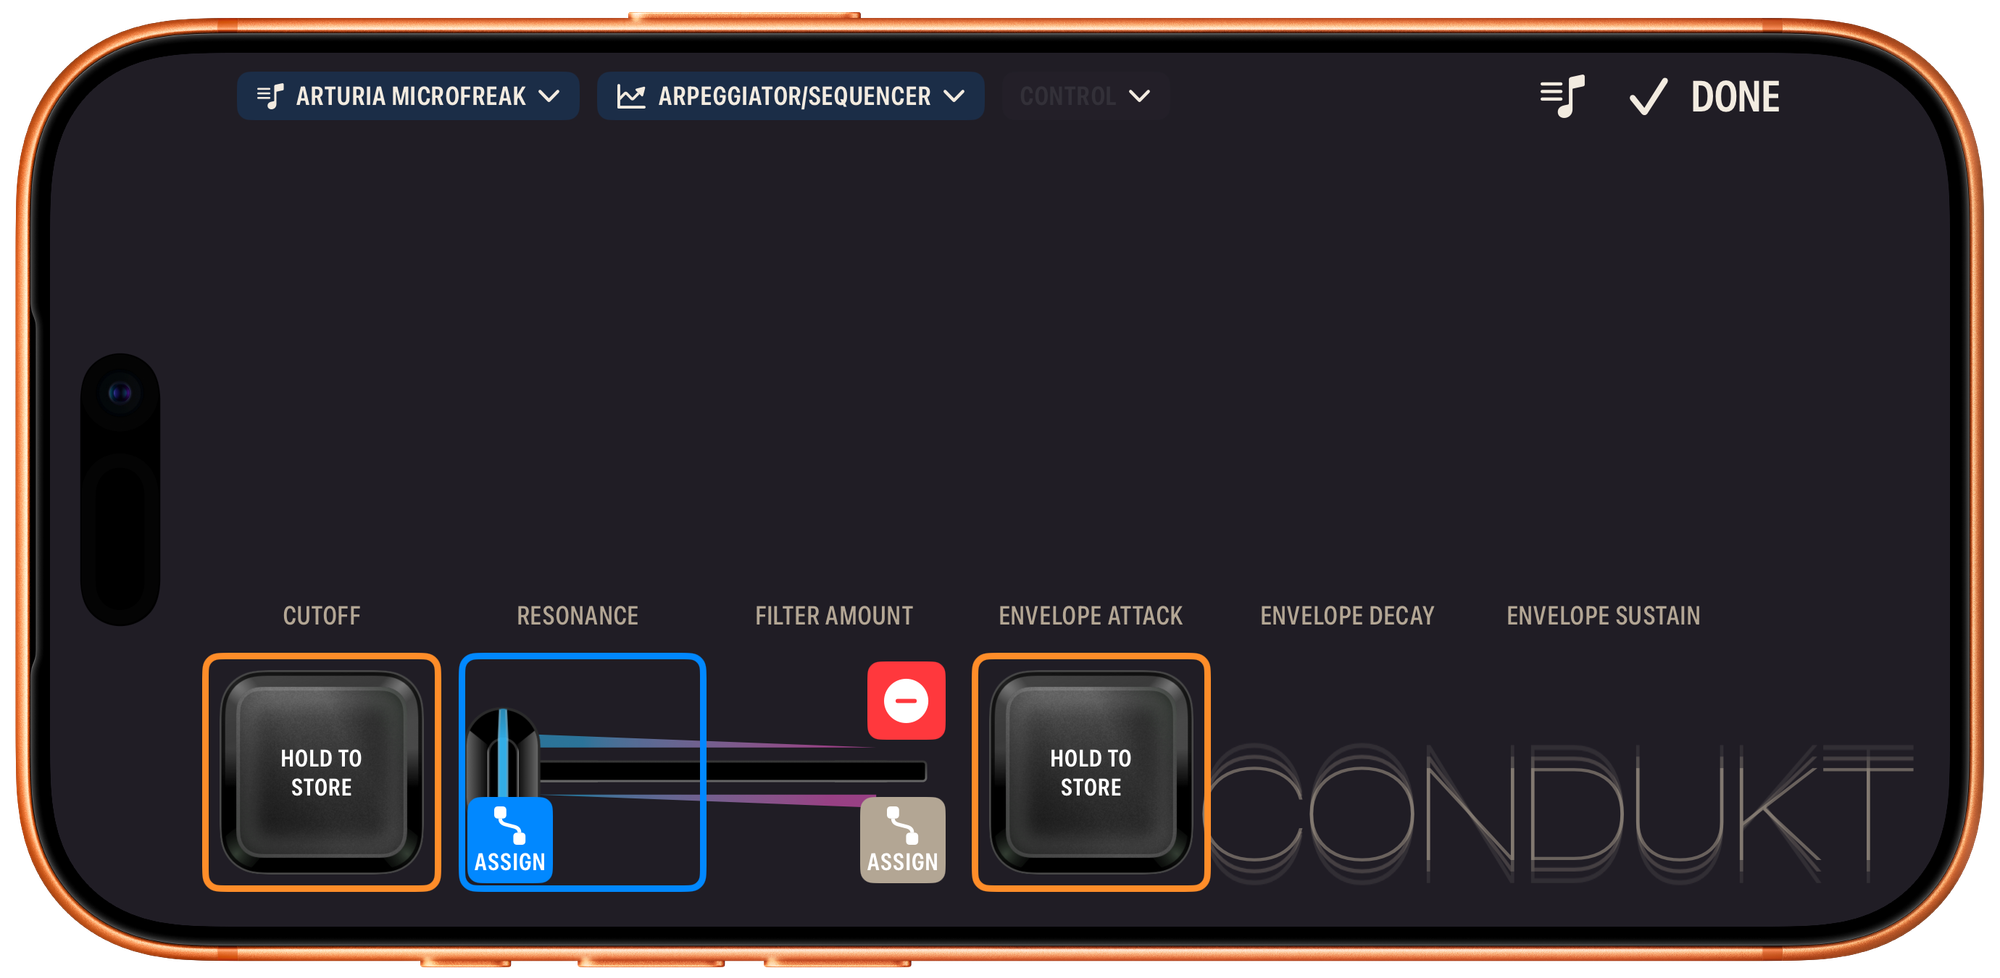
A Recall is a snapshot button. When you create one, you bind it to specific faders or crossfaders you want to memorize. Tap and hold Recall to store current state of faders; tap it to recall that state, either instantly or with a smooth transition.
Initial State Management: One of the most practical uses for Recalls is setting up your starting point. Before you start a jam session, set all your faders where you want them, then save a Recall. Now you can always return to that home configuration instantly.
Beat-Matched Transitions: Recalls can transition over time or beats. Want your filter to sweep open over exactly 4 beats? Set the transition to 4 beats, and Condukt will smoothly interpolate all bound faders over that time. Or use time-based transitions (seconds) for more fluid, non-rhythmic changes. The beats are defined by BPM set in Edit mode of the board, it is currently not synced from MIDI.
Use Recalls for:
- Setting initial synth state at the start of a jam
- Saving different "scenes" within a track (verse bass sound, chorus lead sound, etc.)
- Beat-matched transitions that lock to tempo (e.g., roll into a new scene over 4 beats)
- Time-based smooth transitions for evolving sounds
- Switching between multiple parameter combinations on the fly
- Scene morphing (with Crossfaders)
Think of Recalls as: Your own custom presets, but faster and more flexible than relying on the synth alone, with built-in morphing.
Note: When you place a Recall button, you need to assign it to some faders, so it knows what you want to memorize. This way you can have many Recall buttons, all in charge of different aspects of your control surface state.
3. Crossfaders (Scene Morphing)
Here's where it gets interesting. A Crossfader lets you morph between multiple Recall scenes using a single slider. Inspired by the Octatrack's scene crossfader, this control maps its position to multiple faders at once, with independent curves for each.
Example:
- Recall A: Dark, filtered bass (filter cutoff: 30%, resonance: 70%)
- Recall B: Bright, open lead (filter cutoff: 90%, resonance: 20%)
- Crossfader: Smoothly morph between A and B with a single gesture
Use Crossfaders for:
- Smooth transitions between saved scenes
- Dynamic performance gestures (sweep from one sound to another)
- Complex parameter changes with a single control
Think of Crossfaders as: A scene interpolation engine that gives you continuous control between discrete snapshots.
Note: After you place a Crossfader, you need to assign at least one side of it to a Recall button. When the other side is unassigned it operates similarly to Octatrack's fader: it will try to blend the saved scene with the real-time fader positions.
3b. Crossfader Sets
To make things (a lot) easier, you can plop down a Crossfader Set: it puts down two Recall buttons and a Crossfader between them, pre-assigned and ready to go. In addition, Recall buttons are also pre-assigned to every fader on the board, so that it's very easy to get it going. You just need to tap and hold on a Recall button to store the current state of your controls.
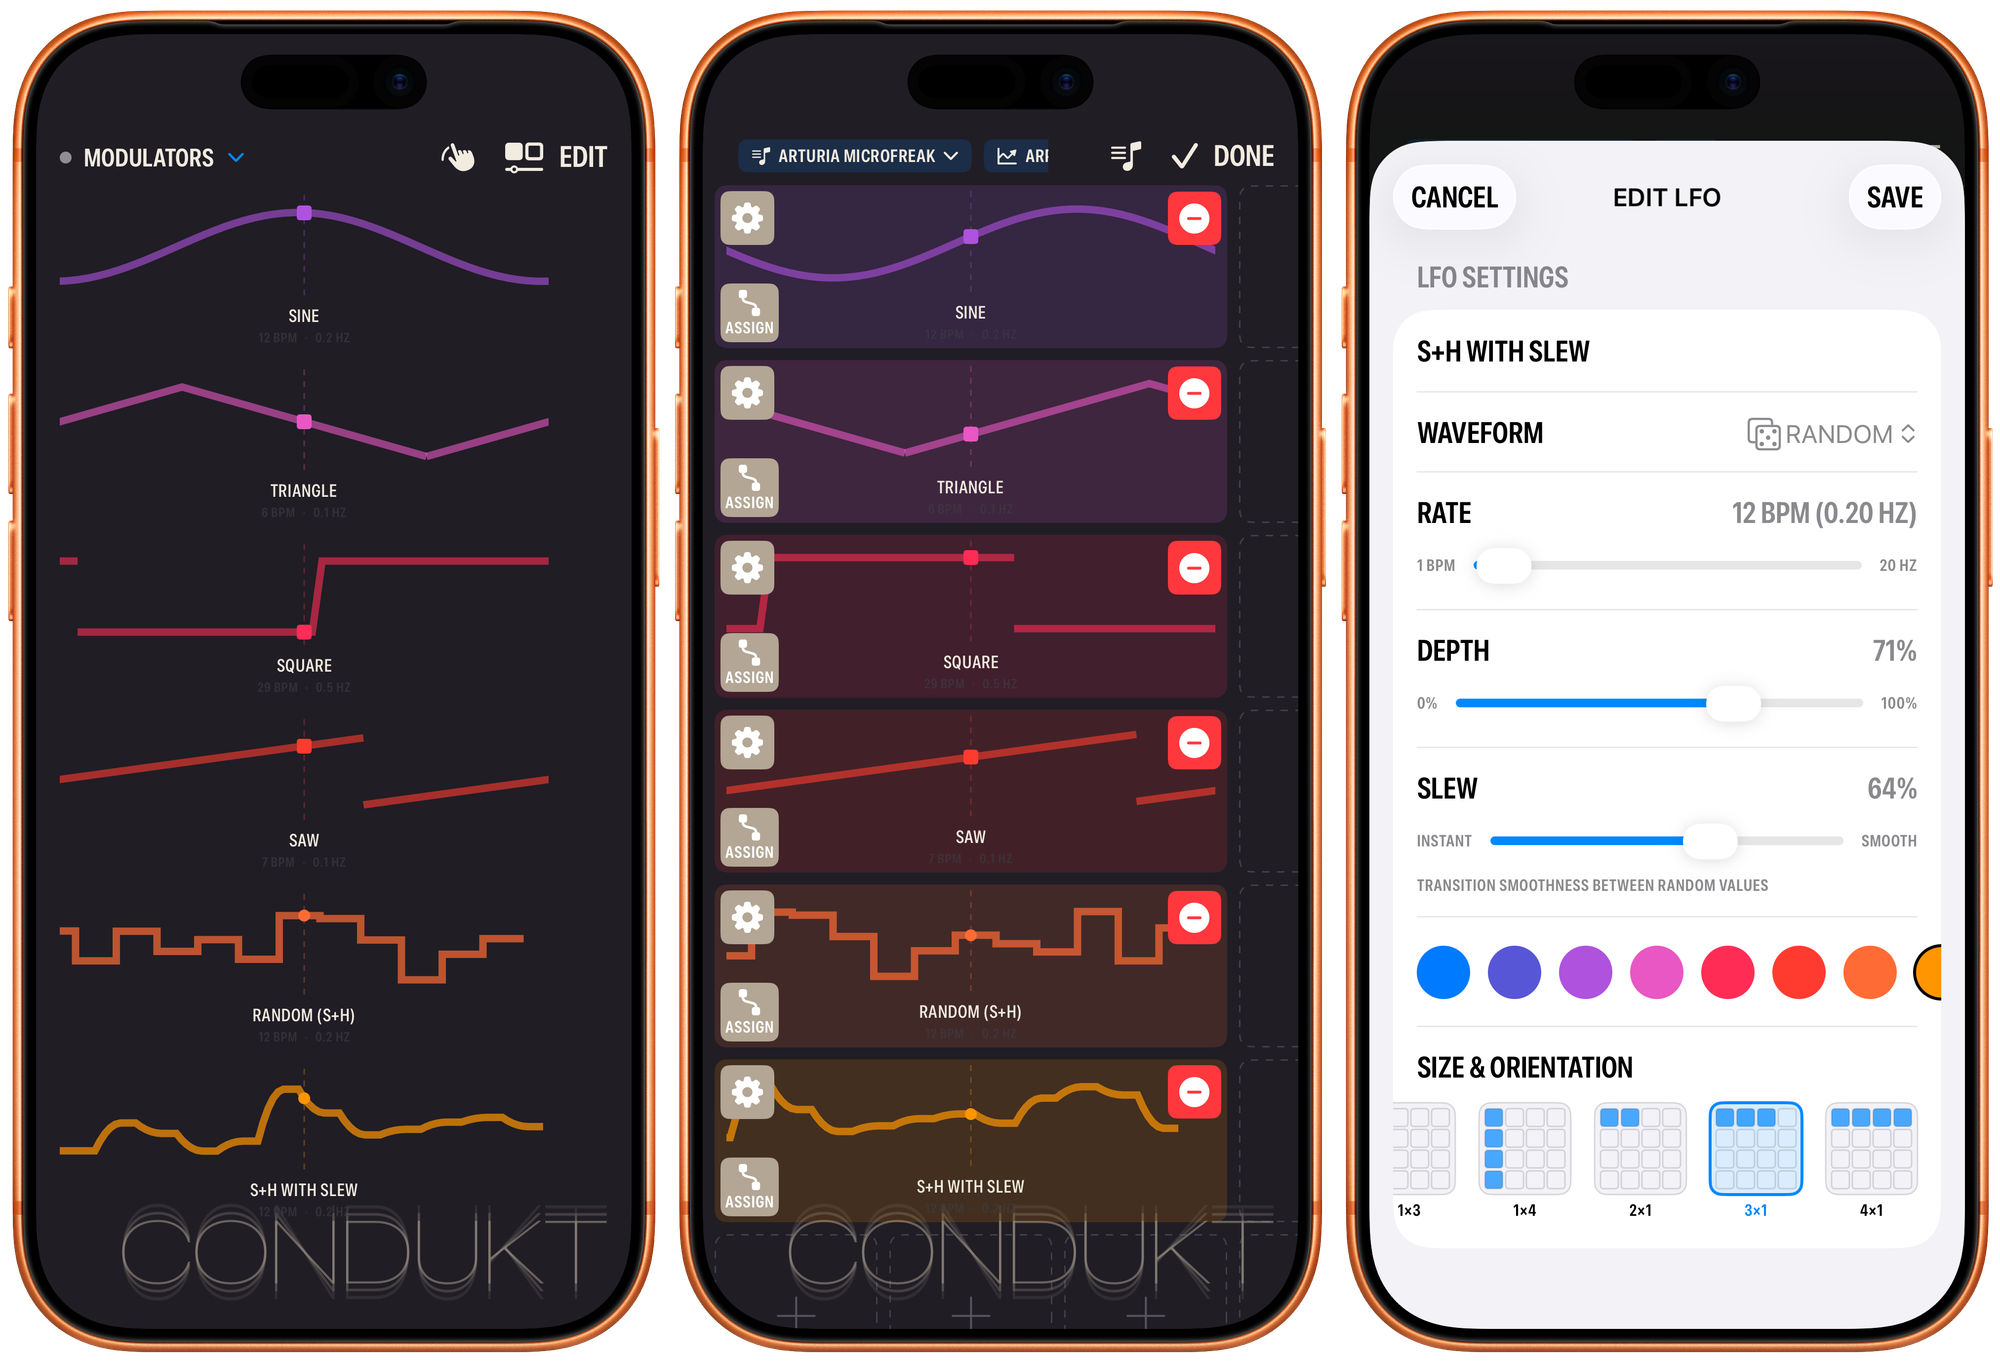
4. LFOs (Modulation)
LFOs auto-modulate faders and crossfaders in real time. Choose from multiple waveforms (sine, triangle, square, saw, random/sample-and-hold), set the rate and depth, and assign the LFO to a fader or a crossfader.
Use LFOs for:
- Adding movement to static sounds (auto-filter sweeps, tremolo, vibrato)
- Modulating crossfaders for evolving scene morphs
- Creating rhythmic patterns synced to tempo
- Automating complex parameter changes
Think of LFOs as: Set-and-forget automation that keeps your sounds alive and moving.
Note: You can play the LFOs as well, just swipe up/down to change LFO depth, and left/right to change the speed.
5. Sequencers
Condukt includes built-in step sequencers that send MIDI notes directly to your hardware synths. Each sequencer runs on its own track with full control over which synth channel it targets, so you can run multiple instruments simultaneously on the same board.

Musical Intelligence: Choose from chromatic, major, minor, pentatonic (major/minor), dorian, or mixolydian scales. The sequencer quantizes to your selected scale and root note, keeping you in key automatically.
Proper MIDI Clock: Generates industry-standard 24 PPQN MIDI clock messages and sends transport controls (start/stop/continue) to your synths. If your gear supports MIDI clock sync, it'll lock right in.
Generative Playback: Each step has independent velocity, gate length, and note parameters you can tweak. Regenerate patterns on the fly while maintaining your musical constraints.
Multiple Sequencers: Add as many as you need to a board. They all sync to the same master clock, keeping everything tight.
Visual Feedback: Real-time step visualization shows you where you are in the pattern and what notes are playing as they happen.
Global BPM Control: Tap tempo or manual entry. When you adjust the BPM, all sequencers and beat-synced automation follow along.
Use Sequencers for:
- Adding melodic or rhythmic sequences to your performance
- Driving multiple synths from a single board with independent patterns
- Creating evolving generative patterns with scale constraints
- Syncing external gear via MIDI clock output
- Building layered, polyrhythmic textures across multiple tracks
Note: You can enable/disable MIDI clock output in the BPM settings. Enable it if you want the sequencers to drive your external gear's tempo, or keep it internal if your hardware is running on a different clock.
5b. Conduktor Sequencer
We're calling this a Creative sequencer: it lets you create fun musical patterns in seconds, with repeating patterns, pages and randomization.
The Conduktor sequencer control includes five different tab modes, each offering a different view and set of tools for shaping your patterns. Here's how each mode works and what you can do with it.
Notes
The Notes tab is your primary view for seeing and editing your melodic patterns. Each of the 16 cells displays the note name for that step (like "C4" or "F#5"), and you can see which steps are currently enabled. When the sequencer is playing, you'll see the playhead move across the grid in real-time.
What you can do:
- Tap any cell to set the end of sequence
- Loop ranges - Tap the curly braces button (top right), then tap two cells to set a loop range. The sequencer will only play steps within this range. Tap the button again to clear the loop
- Rotate pattern - The forward arrow button rotates your entire pattern forward one step (last step will become first). Long-press the same button to rotate backward
- Dice button - Randomizes all notes within your current scale and range, creating instant new melodies while preserving your density and rhythm
This is where you'll spend most of your time when crafting melodic sequences and creating variations on the fly.
Range
Range mode gives you powerful tools for transposing and constraining your patterns. The top row provides instant transposition controls, while the bottom section shows a visual piano keyboard representing your current scale and range.
What you can do:
- Quick transposition - The top four buttons transpose your entire pattern:
- -12: Down one octave
- -1: Previous note in your current scale (scale-aware)
- +1: Next note in your current scale (scale-aware)
- +12: Up one octave
- Semitone range - The middle buttons (1, 3, 5, 7, 12, 18, 24, 36) set how many semitones from the root note your pattern can use. Smaller ranges create tighter, more focused melodies
- Piano visualization - The bottom row shows which keys in the scale are active, helping you understand your melodic space at a glance
The ±1 buttons are particularly useful during performance - they let you transpose patterns through your scale without breaking the musical relationship between notes.
Density
Density mode controls which steps in your pattern are active. Instead of seeing note names, you'll see dot clusters representing the number of enabled steps. This is perfect for creating rhythmic variations or gradually building up patterns without affecting your melodic pattern.
What you can do:
- Set density percentage - Tap any cell to set how many of your 16 steps should be active (each cell represents a different percentage). Enabled steps are randomly distributed across the pattern
- Toggle mode - Tap the grid icon to enter toggle mode, where you can manually turn individual steps on or off by tapping them. This lets you sculpt exact rhythmic patterns
- Dice button - Randomizes which steps are enabled while maintaining your current density percentage, creating instant rhythmic variations
The density control is great for building tension in a performance - start sparse and gradually increase the density, or use toggle mode to create syncopated rhythms.
Velocity
Velocity mode adjusts the overall loudness of your pattern. All 16 cells show different velocity percentages, from very quiet (5%) to full volume (100%). This is a quick way to create dynamics in your sequence.
What you can do:
- Set velocity multiplier - Tap any cell to set the global velocity for all notes in your pattern
The percentage you select multiplies all note velocities, so you can make entire patterns louder or softer without changing their internal dynamics. Use this during performance to create build-ups and breakdowns, or to balance the volume of multiple sequencers running simultaneously.
Pattern
Pattern mode is your control center for timing, page management, and playback variations. Here you'll find everything from note divisions to the powerful multi-page and AAAB features.
What you can do:
- Note divisions - The top three rows let you choose how fast your sequencer plays relative to the global BPM. Options range from whole notes (1/1) down to 32nd notes (1/32), plus triplets and dotted notes. Choose faster divisions for drum patterns, slower ones for evolving pads
- Multi-page patterns - The bottom row (P1-P4) represents four independent pattern pages. Tap to switch between pages, or tap the curly braces button to set a page range that plays sequentially (like P1→P2→P1→P2...)
- AAAB mode - This creative mode inspired by Der Mann mit der Maschine splits your active sequence in half and plays it as: first half, first half, first half, second half. Works with both single pages and page ranges, creating instant melodic variations. In the simplest terms, if you have selected 2 pages to play, you will hear the first page 3 times, then the second page once before returning to the first page 3 times again, etc. If you're playing a single page short 8-note pattern, you'll hear first four notes three times, then last four notes once before repeating.
- Memory chip - Store and recall the currently active pattern page. Long-press to save (flashes "Store"), tap to load (flashes "Load"), or long-press twice on the same pattern to clear the memory (flashes "Clear")
Pattern mode is where sequencing gets really interesting. Try setting up different melodic ideas on each page, then use page ranges and AAAB mode to create evolving, non-repetitive sequences that keep your tracks moving forward. Multipage and AAAB modes respect any ranges you've selected in the Notes page, and applies them the same way to all selected pages.
Tips for Performance
- Combine modes during playback - randomize notes on the Notes tab, adjust density, then transpose with Range controls
- Use memorize to save variations before experimenting - you can always get back to what worked
- Page ranges + AAAB creates complex patterns from simple building blocks
- Toggle mode on the Density page lets you manually program exact rhythmic patterns
- The ±1 buttons on the Range page are perfect for live melodic variations that stay in key
5b. Turing Machine Sequencer
The Turing Machine sequencer is inspired by the legendary Music Thing Modular Turing Machine, a random looping sequencer that originated in the Eurorack modular synthesizer world. The original hardware module, designed by Tom Whitwell, uses a shift register to create sequences that can range from completely locked and repeating to fully random, with a "controlled chaos" sweet spot in between where patterns slowly evolve over time.
In Condukt, we've adapted this concept for MIDI, giving you two independent lanes that can generate endlessly evolving melodic patterns for your hardware synths.
What Makes It Different
Unlike a traditional step sequencer where you program every note, the Turing Machine generates patterns that mutate over time. The core idea is simple: a sequence loops, but on each pass there's a chance that notes will change. Set the corruption low and your pattern stays locked. Crank it up and chaos ensues. Find the sweet spot in the middle, and your sequences will slowly drift and evolve—familiar enough to groove with, unpredictable enough to keep things interesting.
The Interface
The Turing Machine sequencer features two independent lanes (Seq 1 and Seq 2), each with its own:
- 8-step pattern display showing which steps are active (gates) and the current playhead position
- Corruption slider controlling how much the pattern mutates
- Independent clock division (1/16, 1/8, 1/4T, 1/4)
- Lock, Mute, and Length controls
Controls Explained
Corruption Slider
The horizontal slider at the heart of each lane. Drag it to control mutation:
- 0%: Pattern is completely locked, repeats exactly
- 1-50%: Only pitch values can change (rhythm stays intact)
- 51-100%: Both pitch AND gate triggers can change (rhythm evolves too)
The slider shows "Pitch" or "Pitch + Gate" to indicate which mode you're in, along with a rolling die icon that spins as you increase randomness.
Octave Transpose (↑↓ arrows)
Shift all notes in a lane up or down by one octave. The button brightness indicates where in the MIDI range your notes currently sit.
Pattern Rotate (→ arrow)
Shifts the entire pattern one step to the right, rotating the last step to the beginning. Great for finding new variations on an existing pattern.
Lock (🔒)
When locked, the lane ignores the corruption slider entirely—your pattern stays exactly as is, even at 100% corruption. Useful for locking in a bassline or motif temporarily.
Mute (🔇)
Silences MIDI output for that lane while keeping the pattern running and evolving. The sequence continues to mutate; you just won't hear it until you unmute.
Length (tap steps)
Tap any step in the pattern to set the loop length. Tap step 4 to loop just the first 4 steps; tap step 8 to use the full pattern.
Speed (1/16, 1/8, etc.)
Each lane can run at its own clock division, creating polyrhythmic textures. In Parallel mode, lanes run independently. In Chained mode, both lanes share Seq 1's division.
Mode Toggle (↻)
- Parallel (two arrows): Both lanes play simultaneously at their own speeds
- Chained (single arrow): Seq 1 plays through completely, then Seq 2 plays, then back to Seq 1, like an A/B pattern
Scale & Root
Tap the scale button (showing root note and scale type) to constrain generated notes to a musical scale. All mutations will respect the selected scale, keeping things musical even at high corruption.
Seed (🎲)
Generates a completely new random pattern for both lanes. Hit this when you want a fresh starting point.
Performance Tips
- Start locked, then open up: Begin with corruption at 0%, find a pattern you like with the Seed button, then slowly increase corruption to let it evolve
- Use different lengths: Set Seq 1 to 5 steps and Seq 2 to 7 steps for patterns that phase against each other
- Lock one, free the other: Keep your bass locked while letting the lead line wander
- Chained mode for call-and-response: Use chained mode with different note ranges for melodic dialogue
- Mute for builds: Mute a lane, let it mutate, then unmute for a surprise variation
Syncing with Other Sequencers
The Turing Machine shares Condukt's master clock with the standard Conduktor sequencer. You can run both types simultaneously, perhaps a Conduktor handling bass while a Turing Machine generates evolving melodies, and they'll stay perfectly in sync.
Synth Channels
For all this to work smoothly, you need to add the synth you're using. At the moment it all happens over USB, and Condukt tries to make it simple: it will auto-detect your synth, then fetch MIDI parameter definitions from midi.guide. But you need to set the MIDI channel you configured on the synth.
Some synths, like Digitakt, have several tracks you can control at once. For those you need to add each track you want to control as a Synth Channel, and name them appropriately ("Track 1", "Kick", whatever). Then, you can place a fader for "Kick", and it will control that specific track, on that specific synth.
Synth Channels you define live outside the boards you create, so you can create multiple boards for different songs or performance purposes, using the same MIDI setup.
Putting It All Together
Here's a typical workflow:
- Add faders for the parameters you want to control (filter, envelopes, effects, etc.)
- Create Recalls bound to those faders to save different parameter combinations (scenes)
- Add a Crossfader to morph smoothly between those scenes
- Assign an LFO to the crossfader (or individual faders) for automatic movement
Practical Example: Live Bass Performance
Setup:
- Faders: Filter Cutoff, Resonance, Envelope Decay
- Recall A: Assigned to the three faders: deep, subby bass (cutoff low, decay long)
- Recall B: Assigned to the three faders: punchy, plucky bass (cutoff high, decay short)
- Crossfader: Morphs between A and B
- LFO: Assigned to the crossfader, slowly oscillates the sound between the two scenes
Result: Your bass sound continuously evolves between two extremes, and you can still manually grab the crossfader or individual faders to take control at any moment.
Practical Example: Multi-Track Digitakt Control
Setup:
- Digitakt: 4 drum tracks playing kick, snare, hi-hat, clap
- Fader 1: Mapped to filter cutoff on all 4 tracks simultaneously
- Fader 2: Mapped to filter resonance on all 4 tracks
- Recall "Closed": Filters closed, dark drum sound
- Recall "Open": Filters wide open, bright drum sound with 4-beat transition
Performance:
- During your intro, hit Recall "Closed" to start with a dark, muted drum section
- As the track builds, hit Recall "Open": over exactly 4 beats, all four tracks sweep their filters open together
- During the drop, grab Fader 1 to manually ride the filter cutoff across all drums at once
Result: You're controlling 8 parameters (4 tracks × 2 filter parameters) with 2 faders and 2 buttons, with beat-synced transitions that feel perfectly musical.
So that’s about it, now let's make some noise.